
Nutanix: Invisible Wires: Agentic Cloud
Your first Nutanix cluster in AWS, without writing a line of code
AWS has just changed how new customers get started. On September 16, 2026 it published AWS reimagines the getting started experience. In AWS's words: "Instead of having to complete configuration tasks before you can work on your project, you start with sensible defaults and simple administration." You sign in with an account you already have, such as Google or GitHub, invite people by email, and turn on the advanced features later "with no migration and no downtime."
That's a good front door for someone starting from nothing. This post is for someone who isn't: you already run Nutanix in your own datacenter, you've been asked to get a first footprint into AWS, and you've never written infrastructure as code. You don't need to. Everything below is done in web consoles, with clicks.
Why AWS's new front door isn't yours
AWS says so itself. Its Compare sign-up options page says: "If you need fine-grained control over your users or role-based permissions, do not use Sign up for AWS (new)." In the new experience you can't choose which AWS Region your resources go into, and the private links to your own datacenter (Site-to-Site VPN, Direct Connect, Transit Gateway) aren't available until you switch on the advanced features (supported services list).
NC2 on AWS needs exactly those things: a Region you choose, where the server type you want is offered, and a private link back to your datacenter so your two Nutanix sites can talk. So you go in through the normal door, with your company's AWS team. I haven't tested NC2 inside the new experience and I'm not claiming it can't work there. It just isn't built for what you're doing.
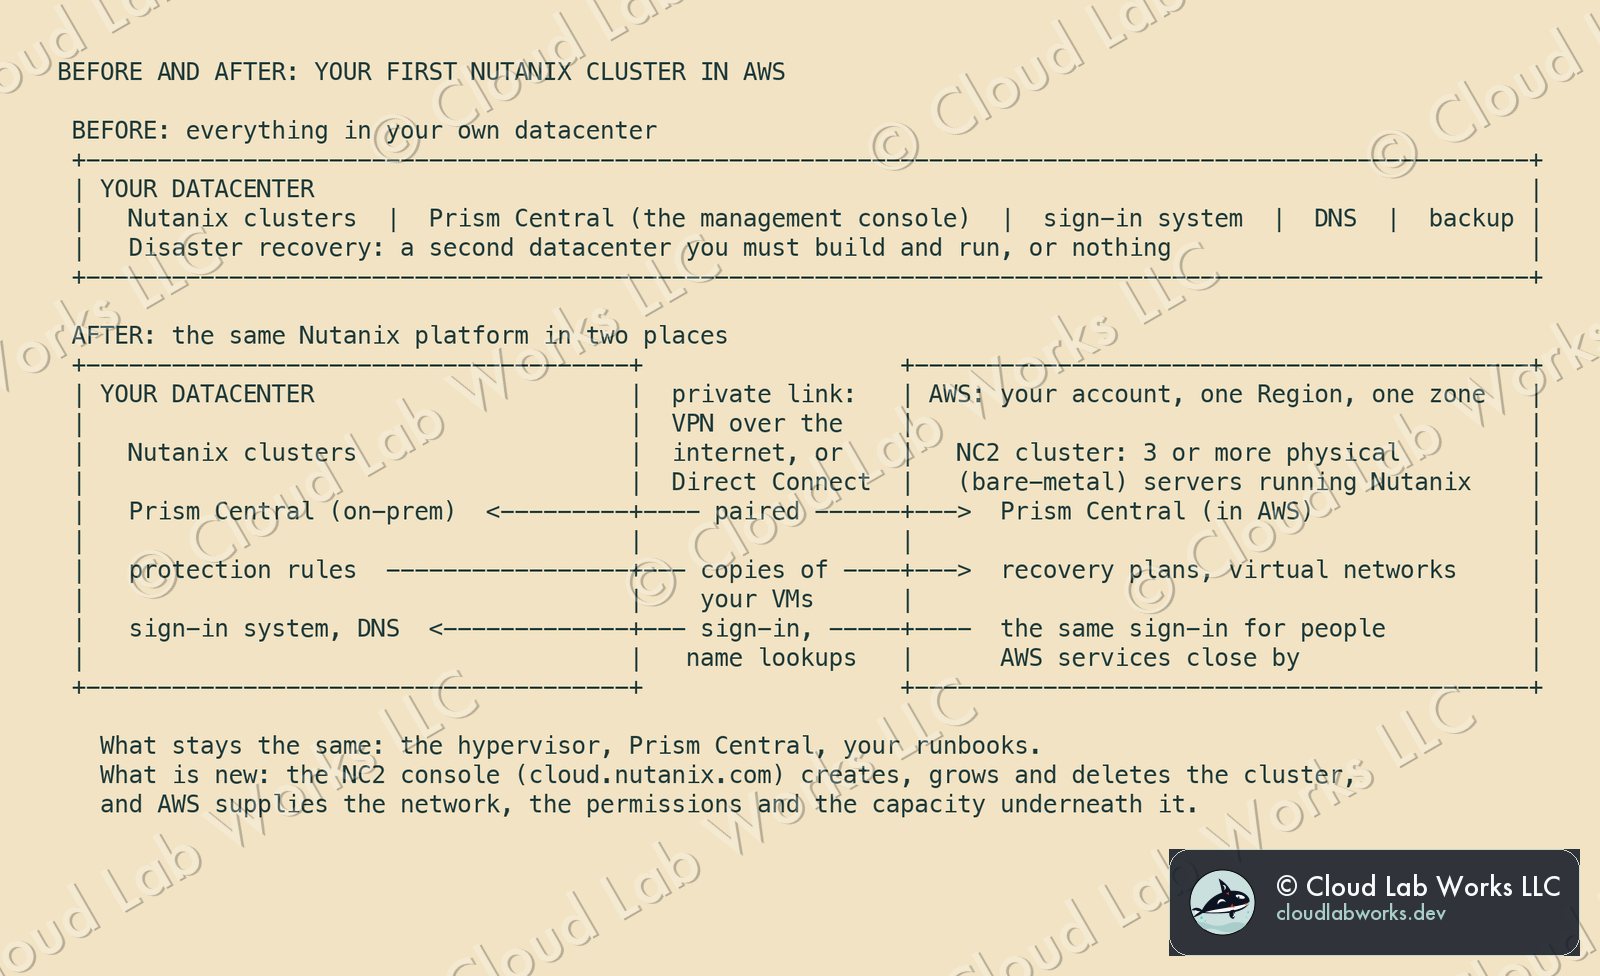
What does carry over is the idea: get a sensible starting point quickly, and add depth later without rebuilding. With NC2, the cloud cluster runs the same Nutanix software and the same management console your team already uses. Nothing gets rewritten to make the first move.
A few words first
You'll meet these terms in the first few steps. Each one is explained again where it first matters, and they're all in the glossary at the end.
- NC2 (Nutanix Cloud Clusters): Nutanix's software running on physical servers that you rent in AWS, inside your own AWS account.
- AWS account: your company's container for everything it runs in AWS. Permissions and bills are tracked per account.
- Prism Central: the Nutanix management console for clusters, VMs, networks and disaster recovery.
Before you start
Accounts you need
- An AWS account set aside for this, created by your company's cloud team inside its AWS Organization (the company's group of AWS accounts with shared rules).
- Someone who can sign in to that AWS account with enough permission to create IAM roles (permission sets that a service can use) and run CloudFormation (AWS's tool that builds resources from a template). The NC2 guide asks for the IAMFullAccess and AWSCloudFormationFullAccess permissions for this one step.
- A My Nutanix account (Nutanix's customer portal) under a work email address. Personal addresses such as gmail.com are refused.
Who needs to be in the room
- The network team. They pick the address ranges, build the network in AWS and connect it to your datacenter. You can't finish without them.
- The security team. AWS organizations often have company-wide rules (service control policies) that limit what anyone can do in an account. These rules can block NC2. Security needs to check them before you start.
- The AWS account owner (often a cloud or platform team), to raise limits and run the permissions template.
- The owner of the first application you'll move, to agree a test and a time to switch over.
Decisions to make before anyone clicks
- Region and zone. A Region is a geographic area where AWS runs datacenters, such as US West (Oregon). An Availability Zone (AZ) is one group of datacenters inside a Region. NC2 puts a whole cluster in one AZ, on 3 to 28 servers. Not every server type is offered in every AZ. Check the instance table first.
- Server type. NC2 runs on bare-metal hosts: whole physical servers rented from AWS, with nothing else running on them. The type sets each server's cores, memory and disk.
- Networking model. Choose Flow Virtual Networking, which lets you create your VMs' networks yourself in Prism Central. This post assumes it. It can only be switched on when the cluster is created, never later.
- First workload. Will you start with disaster recovery (a standby copy in AWS) or a migration (moving an application for good)? That decides what the link to your datacenter has to carry.
Time budget
These are my planning estimates, except the cluster build time, which comes from the NC2 guide.
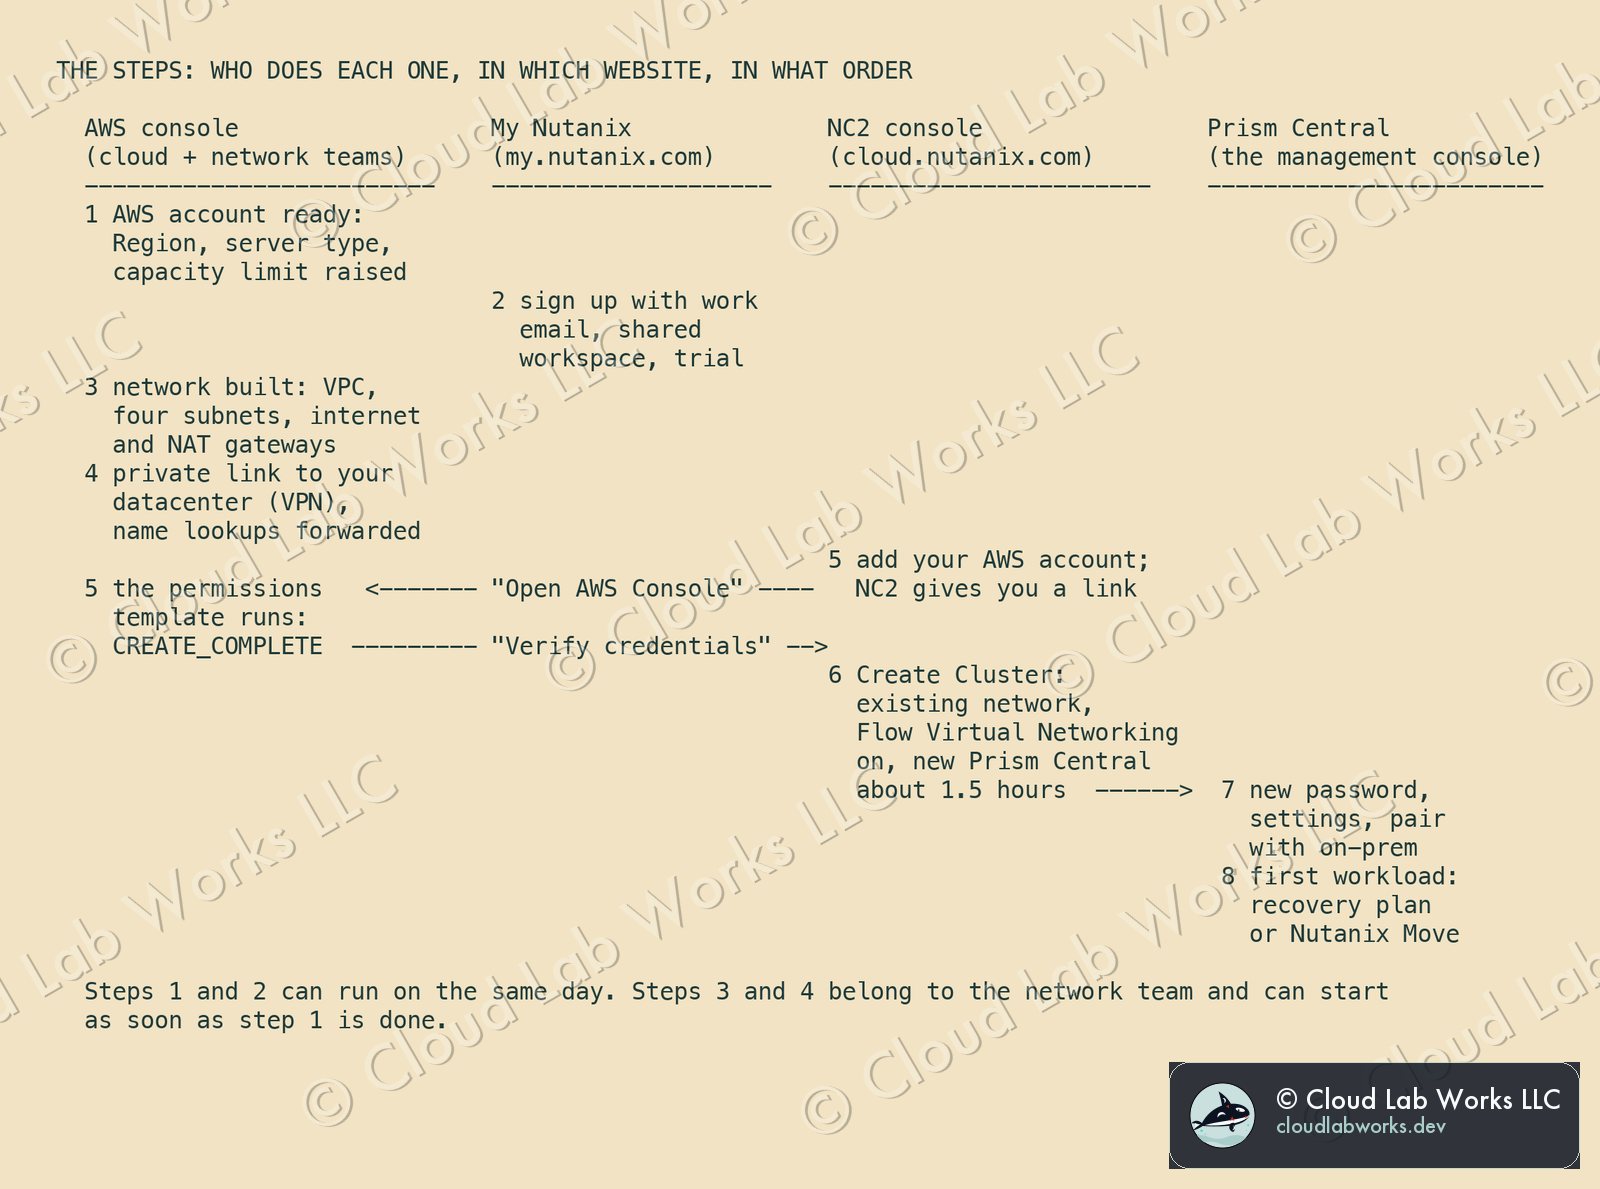
| Step | Hands-on time | Waiting or elapsed time |
|---|---|---|
| Before-you-start meeting | 2 hours | |
| 1. AWS account ready | 1 hour | the limit increase can take days; AWS may approve, deny or partly approve it |
| 2. My Nutanix | 30 minutes | |
| 3. Network built (network team) | half a day | |
| 4. Private link to your datacenter (network team) | a day for a VPN | Direct Connect is a separate project |
| 5. Connect NC2 to your AWS account | 30 minutes | a few minutes for the template |
| 6. Create the cluster | 30 minutes in the wizard | about 1.5 hours of build time |
| 7. Set up Prism Central and pair it | half a day | |
| 8. First workload | a day for a test application | the real switch-over goes in a planned window |
The steps
Step 1: get the AWS account ready
What you're doing: making sure the AWS account can hold an NC2 cluster.
Why: the cluster creation fails if the account isn't allowed enough servers, or can't use the Region you picked.
The clicks (AWS console, account owner):
- Sign in at console.aws.amazon.com and switch to your chosen Region (top right).
- If AWS doesn't switch that Region on automatically, the account owner enables it first. The NC2 guide warns that some Regions aren't on by default.
- Open Service Quotas (AWS's page of limits per account), find the EC2 limit for your server type, and request an increase. AWS counts these limits in vCPUs, with 2 vCPUs per physical core, and the NC2 guide says to cover one more server than you plan to run. During a server replacement, the cluster briefly has the extra one.
You should see: the quota request approved, at a number that covers your server count plus one.
Common mistake: asking for exactly the servers you'll run. The first time a server is replaced, the cluster needs one more.
Step 2: My Nutanix and a trial
What you're doing: creating the Nutanix-side account that owns your NC2 subscription.
Why: the NC2 console, where you build clusters, opens from My Nutanix.
The clicks (my.nutanix.com):
- Sign up now, fill in the form with your work email, then click the link in the verification email.
- Sign in and open My Nutanix. You get a personal workspace (a workspace is a container for your subscriptions and users). The guide says not to use it for NC2.
- Create a shared workspace where you have the Account Admin role, or join one a colleague invites you to.
- In that workspace, go to Cloud Services, find Nutanix Cloud Clusters (NC2) and click Get Started. In the Billing Center that opens, choose Subscriptions > Add Subscription, click Subscribe under NC2, then Start 30 Day Free Trial under Amazon Web Services, or start a subscription if your company already has one.
- Click Continue to NC2. The NC2 console opens at cloud.nutanix.com.
You should see: a banner at the top of the NC2 console showing your active trial or subscription.
Common mistake: doing all of this in the personal workspace and then having to redo it.
Before others join, decide how they'll sign in. The short version: a few named administrators in My Nutanix, and everyone else through your company's sign-in system. The full design is in Onboarding people into NC2 without tickets.
Step 3: the network team builds the network
What you're doing: creating the private network in AWS where the cluster will live.
Why: the cluster needs a network that already fits your company's address plan. Otherwise it can't connect to your datacenter later without a rebuild.
A few words first:
- VPC (Virtual Private Cloud): your own private network inside AWS. Nothing gets in unless you allow it.
- Subnet: a slice of the VPC's addresses set aside for one purpose.
- CIDR: the way address ranges are written, such as 10.50.0.0/23. The smaller the number after the slash, the bigger the range.
- Internet gateway: the VPC's door to the internet.
- NAT gateway: lets private machines reach the internet, while nothing on the internet can reach them.
- Route table: the list of directions that tells traffic in a subnet where to go next.
The clicks (AWS console, VPC section, network team). The NC2 guide's chapter "Create AWS Resources Manually" has each screen.
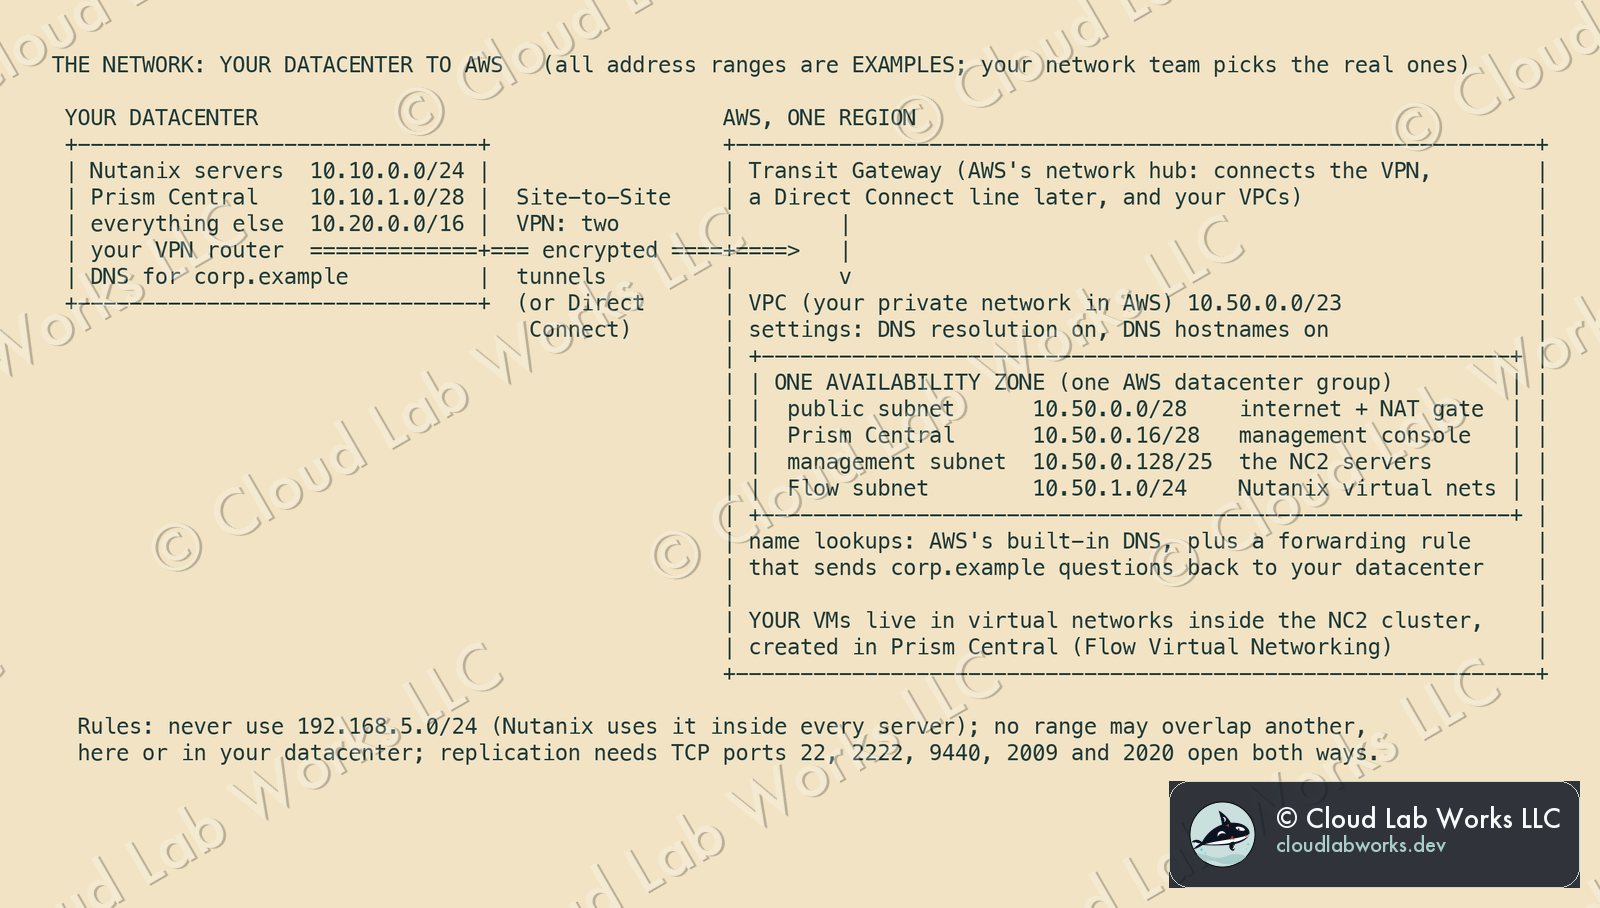
- Create VPC, "VPC only", with the address range your network team chose. For Flow Virtual Networking the guide asks for a /23.
- Create subnet four times, all in the same AZ:
| Subnet | Size | What lives there |
|---|---|---|
| Management (private) | /25 | the NC2 servers themselves |
| Prism Central (private) | /28 | the management console's VMs |
| Flow Virtual Networking (private) | /24 | addresses Nutanix's virtual networks use to reach outside |
| Public | /28 | the NAT gateway; its route table points to the internet gateway |
- Create internet gateway, then Attach to a VPC.
- Create NAT gateway in the public subnet, connectivity Public, with Allocate Elastic IP. Wait until its status changes from Pending to Available.
- Route tables: create one for the public subnet with a route to the internet gateway, and one for the private subnets with a route to the NAT gateway. Associate each subnet with its table. The guide says the management subnet's route table is mandatory.
- In the VPC's settings, turn on DNS resolution and DNS hostnames.
You should see: four subnets in one AZ, a NAT gateway showing Available, and both DNS settings on.
Common mistake: address ranges that overlap your datacenter, or using 192.168.5.0/24. Every Nutanix server uses that range internally, so the guide forbids it.
Step 4: the network team connects AWS to your datacenter
What you're doing: building a private link between the VPC and your datacenter.
Why: your Prism Central in the datacenter and the new one in AWS need to talk privately to copy VMs between sites. The NC2 guide asks for "either VPN or Direct Connect" for exactly this.
A few words first:
- Site-to-Site VPN: an encrypted link over the ordinary internet between your datacenter's router and AWS. Each connection has two tunnels, so one can fail without cutting you off.
- Direct Connect: a dedicated private line from your datacenter (or a partner's facility) into AWS. Use it when the VPN isn't fast or steady enough. AWS's Resiliency Toolkit helps you order redundant lines.
- Transit Gateway: AWS's network hub that joins VPCs, VPNs and Direct Connect lines in one place. Start with it, so adding Direct Connect later doesn't mean redoing the VPN.
- DNS: the system that turns names into addresses.
The clicks (AWS console, VPC section, network team), following AWS's VPN guide:
- Customer gateways > Create customer gateway: your datacenter router's public IP address, and its routing details.
- Create the Transit Gateway, then attach the VPC to it.
- Site-to-Site VPN connections > Create: target is the Transit Gateway, customer gateway from step 1.
- Download configuration for your router's make and model, and apply it on the router.
- Add routes so the VPC's private subnets send datacenter traffic to the Transit Gateway.
- For names: AWS's own DNS stays in charge inside the VPC (the NC2 guide says it's always needed). Add a Route 53 Resolver outbound endpoint and forwarding rule so questions about your company's names go to your datacenter's DNS.
- Open the replication ports the guide lists (TCP 22, 2222, 9440, 2009 and 2020) both ways between your datacenter's Nutanix servers and AWS on your own firewall now. After step 6, add the same ports to the security group NC2 creates for the cluster (a security group is AWS's firewall around a machine).
You should see: the VPN connection's tunnels showing UP in the AWS console, and your datacenter's address ranges listed in the Transit Gateway's route table.
Common mistake: replacing AWS's DNS with your company's DNS. Forward to it instead. NC2 needs AWS's DNS to find AWS's own services.
Step 5: connect NC2 to your AWS account
What you're doing: giving NC2 permission to build servers in your AWS account.
Why: NC2 builds and looks after the cluster for you, so it needs a limited, named set of permissions in your account.
A few words first:
- IAM role: a named set of permissions in AWS that a service can use, without anyone sharing a password.
- CloudFormation: AWS's tool that builds resources from a ready-made template. You won't write one. NC2 gives you a finished template and a link to it.
The clicks:
- In the NC2 console, open Organizations. A default organization already exists. Use it, or Create Organization to keep clusters apart by department.
- Open the organization, then Cloud Accounts > Add Cloud Account.
- Choose amazon, give it a name, and enter your AWS account ID without hyphens.
- Under Select Features, tick only what you'll use, then click Generate CloudFormation Template.
- Click Open AWS Console. A new tab opens on CloudFormation's Quick create stack page, already filled in. Make sure you're signed in to the same AWS account whose ID you entered.
- Tick "I acknowledge that AWS CloudFormation might create IAM resources with custom names" and click Create stack.
- Watch the Events tab until the status says CREATE_COMPLETE.
- Back in the NC2 console, click Verify credentials, pick your Region (or all supported Regions), tick the disclaimer, and click Add Account.
In plain words, that template creates two IAM roles. One lets NC2 create, grow and remove your servers. The other lets the servers themselves manage their network connections while they run. That's why NC2 can build a cluster without anyone handing over an AWS password.
You should see: the cloud account listed with status R, which means ready.
Common mistakes: the AWS tab is signed in to a different account than the ID you typed. Or a company-wide permissions rule quietly blocks the roles: the guide says NC2 warns about permission boundaries but doesn't stop you, and cluster operations may then fail. And later on, never delete that stack while a cluster exists. If you turn on new NC2 features later, NC2 asks you to run the updated template again.
Step 6: create the cluster
What you're doing: building the NC2 cluster and its Prism Central in one wizard.
Why: this is the step that turns rented servers into a Nutanix cluster you can manage like the one at home.
The clicks (NC2 console, Clusters > Create Cluster). The tabs come in this order:
- General: cluster name, organization, cloud provider AWS, your cloud account, Region and AZ. Leave Scheduled Cluster Termination unticked: it deletes the cluster and its data at a set time, and that can't be undone.
- Software: license type and software version, as agreed with whoever handles your Nutanix licensing.
- Capacity: server type, number of servers (at least 3), and how many failures the cluster should survive.
- Network: Use an existing VPC, then pick the VPC and the management subnet from step 3. Tick Enable Flow Virtual Networking on this cluster. Under Access Policy, choose Restricted or Disabled, not Public. Public puts the cluster's console on the internet behind a load balancer, which the guide calls "not a recommended configuration." You'll reach it over the VPN instead.
- Cluster Protection: choose "I will protect the cluster myself". The guide says a cluster used for disaster recovery with your datacenter can't also use Cluster Protect. Your datacenter is the protection.
- Prism Central: choose deploy a new Prism Central on this cluster, pick a size (Small, Large or X-large), and set the Prism Central network (the guide's default size is /28) and the Flow Virtual Networking network (at least /24) to match what the network team built in step 3. Note the default sign-in shown on screen. You'll change it in step 7.
- Summary: click Check quotas, review, then Create.
You should see: status Creating, then Running. The guide's estimate is about 1.5 hours with Flow Virtual Networking on and a new Prism Central built with the cluster (about 30 minutes without Flow Virtual Networking). If something goes wrong, look in the NC2 console's Notification Center.
Common mistake: forgetting to tick Flow Virtual Networking. You can't add it later. The only fix is a new cluster.
Step 7: make Prism Central yours, and pair it with home
What you're doing: securing the new management console and linking it to the one in your datacenter.
Why: pairing is what lets the two sites copy VMs to each other.
The clicks (Prism Central in AWS, reached over the VPN):
- Sign in with the default details from step 6 and change the password immediately. Store it in your password manager, never in a document.
- Set name servers and confirm NTP (time) servers. The guide says Prism Central on NC2 "uses the second IP of the AWS VPC as its DNS server by default".
- Connect it to the same sign-in system as Prism Central in your datacenter.
- If Prism Central doesn't answer over the VPN, the guide's section "Prism Central UI Access for Site-to-Site VPN Setup" shows how to open TCP 9440 on its security group.
- Pair it with your datacenter's Prism Central. The guide says this needs the VPN or Direct Connect from step 4, the ports open, and "the existing best practices listed in the Nutanix Disaster Recovery Guide apply."
You should see: each Prism Central listing the other as a paired site.
Common mistake: leaving the default password in place "for now".
Step 8: your first workload
What you're doing: putting a real application on the new cluster.
Why: a cluster with nothing on it proves nothing. Start with one application whose owner agreed to a test.
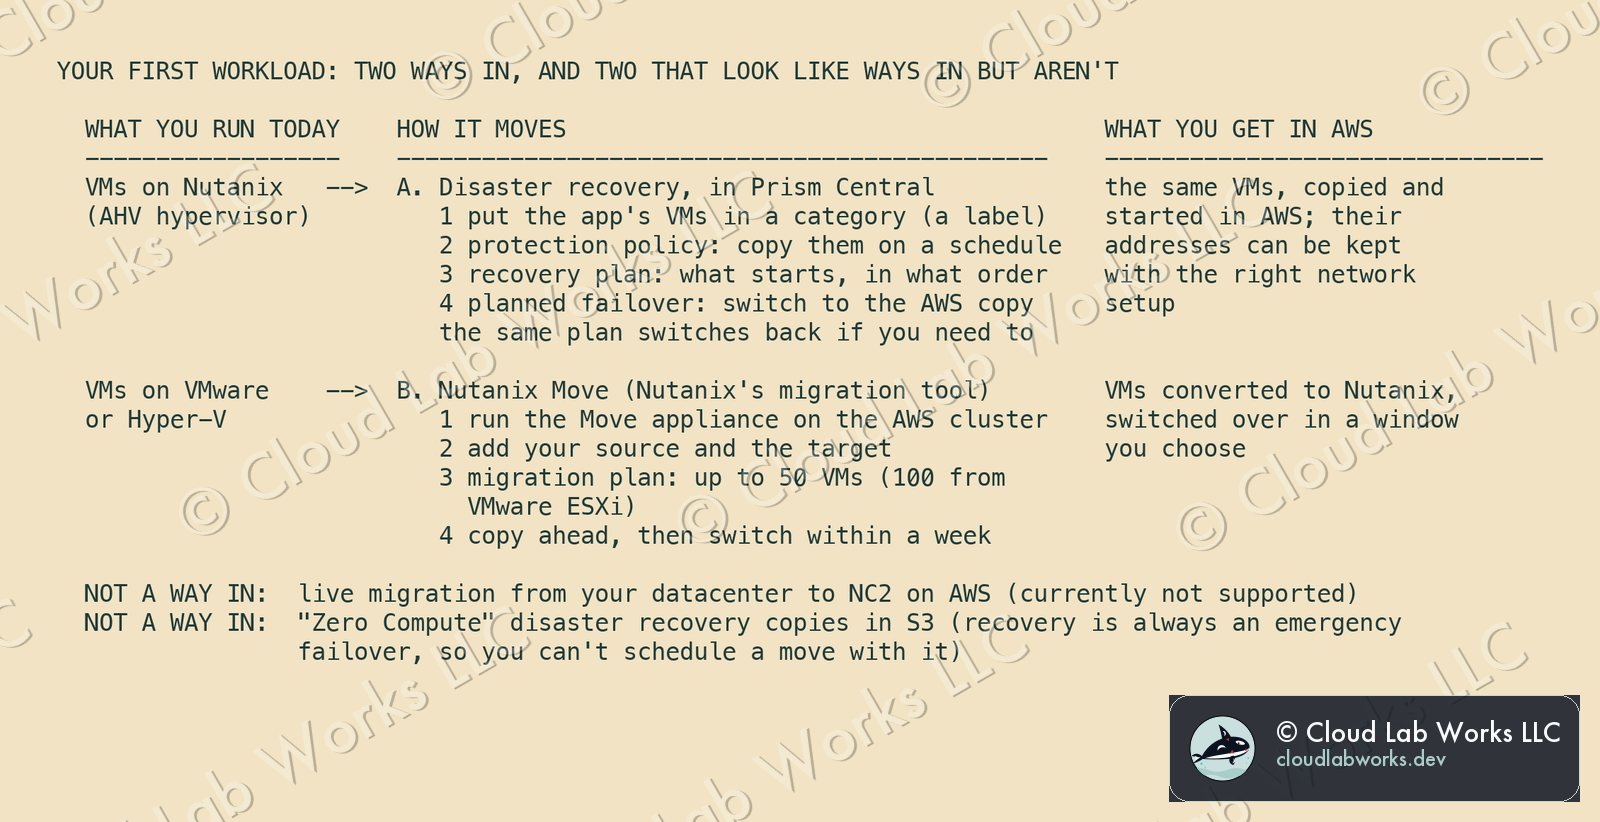
A few words first:
- DR (disaster recovery): keeping a copy of your VMs at another site, so you can run them there if the first site fails.
- Failover: switching an application to its copy at the other site. A planned failover is one you schedule. Failback is switching it home again.
- Nutanix Move: Nutanix's migration tool. It copies VMs from other platforms, such as VMware, onto Nutanix and converts them as it goes.
Way A: disaster recovery, if your datacenter VMs already run on Nutanix's AHV hypervisor. The guide's steps, all in Prism Central: create a category (a label) for the application's VMs, enable disaster recovery, create a protection policy (how often copies go to AWS), and create a recovery plan (what starts, in what order). Then run a planned failover. Copies can be taken as often as hourly, or more often with NearSync. Install Nutanix Guest Tools in the VMs if you want their addresses mapped across. The same plan brings the application home if you need to. This is the natural path, because the migration and your DR design are the same work.
Way B: Nutanix Move, if your VMs run on VMware or Hyper-V. The Nutanix Bible describes Move as "a VM appliance typically hosted on the target AHV cluster." Run it on the NC2 cluster, add your source and target, and create a migration plan. Its best practices: up to 50 VMs per plan (100 from VMware ESXi), copy the data ahead of time, and switch over within a week of that first copy.
You should see: the application running in AWS, its owner signing off the test, and (for Way A) the recovery plan showing a completed failover.
Common mistakes: planning on live migration from your datacenter to NC2 on AWS, which the guide says is "currently not supported." Or using Zero Compute disaster recovery (copies kept in S3 storage with no servers running in AWS) as a migration tool. Its recovery is always an unplanned failover, so you can't schedule a move with it.
Once it's running, a VM on NC2 sits on an ordinary AWS network, one short hop from AWS's own services. If an application needs to call those services, see The Missing Credential.
What it costs the architecture
This isn't about spend. It's about what you're signing up to live with.
- Some decisions can't be undone. Flow Virtual Networking, the server tenancy model and the address ranges are effectively permanent once the cluster exists and your datacenter routes to it. Write them down, with a name next to each.
- Three places to look, not one. The NC2 console runs the cluster's life (create, grow, pause, delete), Prism Central runs everything inside it, and AWS runs the network, the permissions and the limits underneath. Whoever is on call needs access to all three.
- The permissions template is a living thing. New NC2 features mean re-running it, and a new company-wide AWS rule can break it. Put it in the same change process as those rules.
- Lock-in, plainly. Your VMs stay in Nutanix's format, managed the same way in both places, so moving between your datacenter and AWS is a recovery plan, not a rebuild. What you do depend on is AWS having your server type in your zone, and NC2 supporting the types and versions you choose.
- The way out is the way in, reversed. Fail back to your datacenter with the same recovery plan, then delete the cluster from the NC2 console.
What this does not claim
- I haven't run these steps end to end for this post. They come from the public guides, and screens move. The NC2 on AWS guide I used is dated October 7, 2026. Check the current one before you start.
- The address ranges in the diagrams are examples. Your network team picks the real ones.
- The time budget is my estimate, apart from the cluster build time from the guide.
- The Move details come from the Nutanix Bible, because the Move user guide wasn't publicly reachable for me.
- The comparison with AWS's new sign-up is a reading of AWS's documents, not a test. AWS says the new experience is still rolling out.
When you're ready to automate this
Once you've done it by hand and it works, every step above can be written as code, so the next cluster is a review instead of an afternoon of clicking. NC2 on AWS, as code picks up from here. Nothing in this post depends on it.
Glossary
- AHV: Nutanix's hypervisor, the software layer that runs VMs. NC2 on AWS uses only AHV.
- Availability Zone (AZ): one group of AWS datacenters inside a Region. An NC2 cluster lives in one AZ.
- AWS account: your company's container for AWS resources, permissions and bills.
- AWS Organization: your company's group of AWS accounts, with shared rules.
- Bare-metal host: a whole physical server rented from AWS, with nothing else on it. NC2 runs on these.
- Category: a label in Prism Central used to group VMs, for example for protection.
- CIDR: how address ranges are written, such as 10.50.0.0/23. A smaller number after the slash means a bigger range.
- CloudFormation: AWS's tool that builds resources from a template. NC2 hands you a finished one.
- Direct Connect: a dedicated private line between your datacenter and AWS.
- DNS: the system that turns names into network addresses.
- DR (disaster recovery): keeping copies at another site so you can keep running if one site fails.
- Failover / failback: switching an application to its copy at the other site, and switching it home again.
- Flow Virtual Networking: Nutanix's virtual networks, created in Prism Central. On NC2 it must be chosen when the cluster is created.
- IAM role: a named set of AWS permissions that a service can use.
- Internet gateway: a VPC's door to the internet.
- My Nutanix: Nutanix's customer portal, where you sign up and start NC2.
- NAT gateway: lets private machines reach the internet while nothing can reach in.
- NC2 (Nutanix Cloud Clusters): Nutanix's software on bare-metal hosts in your AWS account.
- NC2 console: the website at cloud.nutanix.com where you create, grow, pause and delete NC2 clusters.
- Nutanix Move: Nutanix's tool for moving VMs from other platforms onto Nutanix.
- Prism Central: the Nutanix management console for clusters, VMs, networks and disaster recovery.
- Protection policy / recovery plan: how often VMs are copied to the other site, and how they start up there.
- Quota: a limit AWS sets per account, such as how many vCPUs you may run. You can ask for more.
- Region: a geographic area where AWS runs datacenters.
- Route table: directions that tell traffic in a subnet where to go next.
- Security group: AWS's firewall around a machine or group of machines.
- Service control policy: a company-wide rule in an AWS Organization that limits what anyone can do in its accounts.
- Site-to-Site VPN: an encrypted link over the internet between your datacenter and AWS, with two tunnels.
- Subnet: a slice of a VPC's addresses set aside for one purpose.
- Transit Gateway: AWS's network hub that joins VPCs, VPNs and Direct Connect lines.
- VPC (Virtual Private Cloud): your own private network inside AWS.
Sources: AWS News Blog, AWS reimagines the getting started experience, Micah Walter, September 16, 2026; AWS, Sign up for AWS (new), Compare sign-up options, Supported AWS services for Sign up for AWS (new) and Activate advanced AWS features; Nutanix, Nutanix Cloud Clusters on AWS Deployment and User Guide, edition of October 7, 2026 (Requirements, Creating My Nutanix Account, Starting a Free Trial, Deployment Workflow, Create AWS Resources Manually, Creating an Organization, Adding an AWS Cloud Account, Creating a Cluster, Deployment Stages, Prism Central Configuration, Disaster Recovery, Cross-Cluster Live Migration); The Nutanix Cloud Bible, Migrating to Nutanix; AWS documentation for Get started with Site-to-Site VPN, Site-to-Site VPN, Transit Gateway, the Direct Connect Resiliency Toolkit, Service Quotas, service control policies, Amazon DNS and Route 53 Resolver outbound forwarding. All read October 7, 2026.
Personal blog. Alex works at Nutanix; the opinions here are his own and nothing here is Nutanix confidential: every fact is public or his own field experience.
Follow along
Get the next post without leaving this page: copy the feed into any reader, or get it by email. Live builds and the lab's music stream on Twitch.
Comments